

When was the last time you picked up a pen or pencil to draw? For many of us, drawing is an activity firmly relegated to childhood and is not part of our professional adult lives. The thought of bringing it into the language classroom with adult learners may even be something that makes you scoff. However, drawing is not simply child’s play. As the foundation of all design, architecture and engineering, it has a significant influence on our lives, with every object we own and encounter beginning life via the touch of pen to paper in the form of a simple sketch – from the chair we sit on to the keyboard we type on.
What is graphic facilitation?
As language teachers, one of our main challenges is to communicate meaning to learners who often don’t speak our language. It is unrealistic to expect teachers to learn multiple languages when teaching multilingual classes. Luckily, the language of visuals communicates across languages. One simple, perhaps hand-drawn, icon can instantly convey meaning. Imagine walking around an airport. First, you look for departures, which is signalled by an icon of a plane taking off. Then you head towards security, which has signs for someone going through a scanner. After that, you follow signs to the bathroom. On landing, you look for the baggage reclaim which has a handy suitcase icon to point the way. No matter where you are, or the language the signs are in, there are visuals to aid understanding.
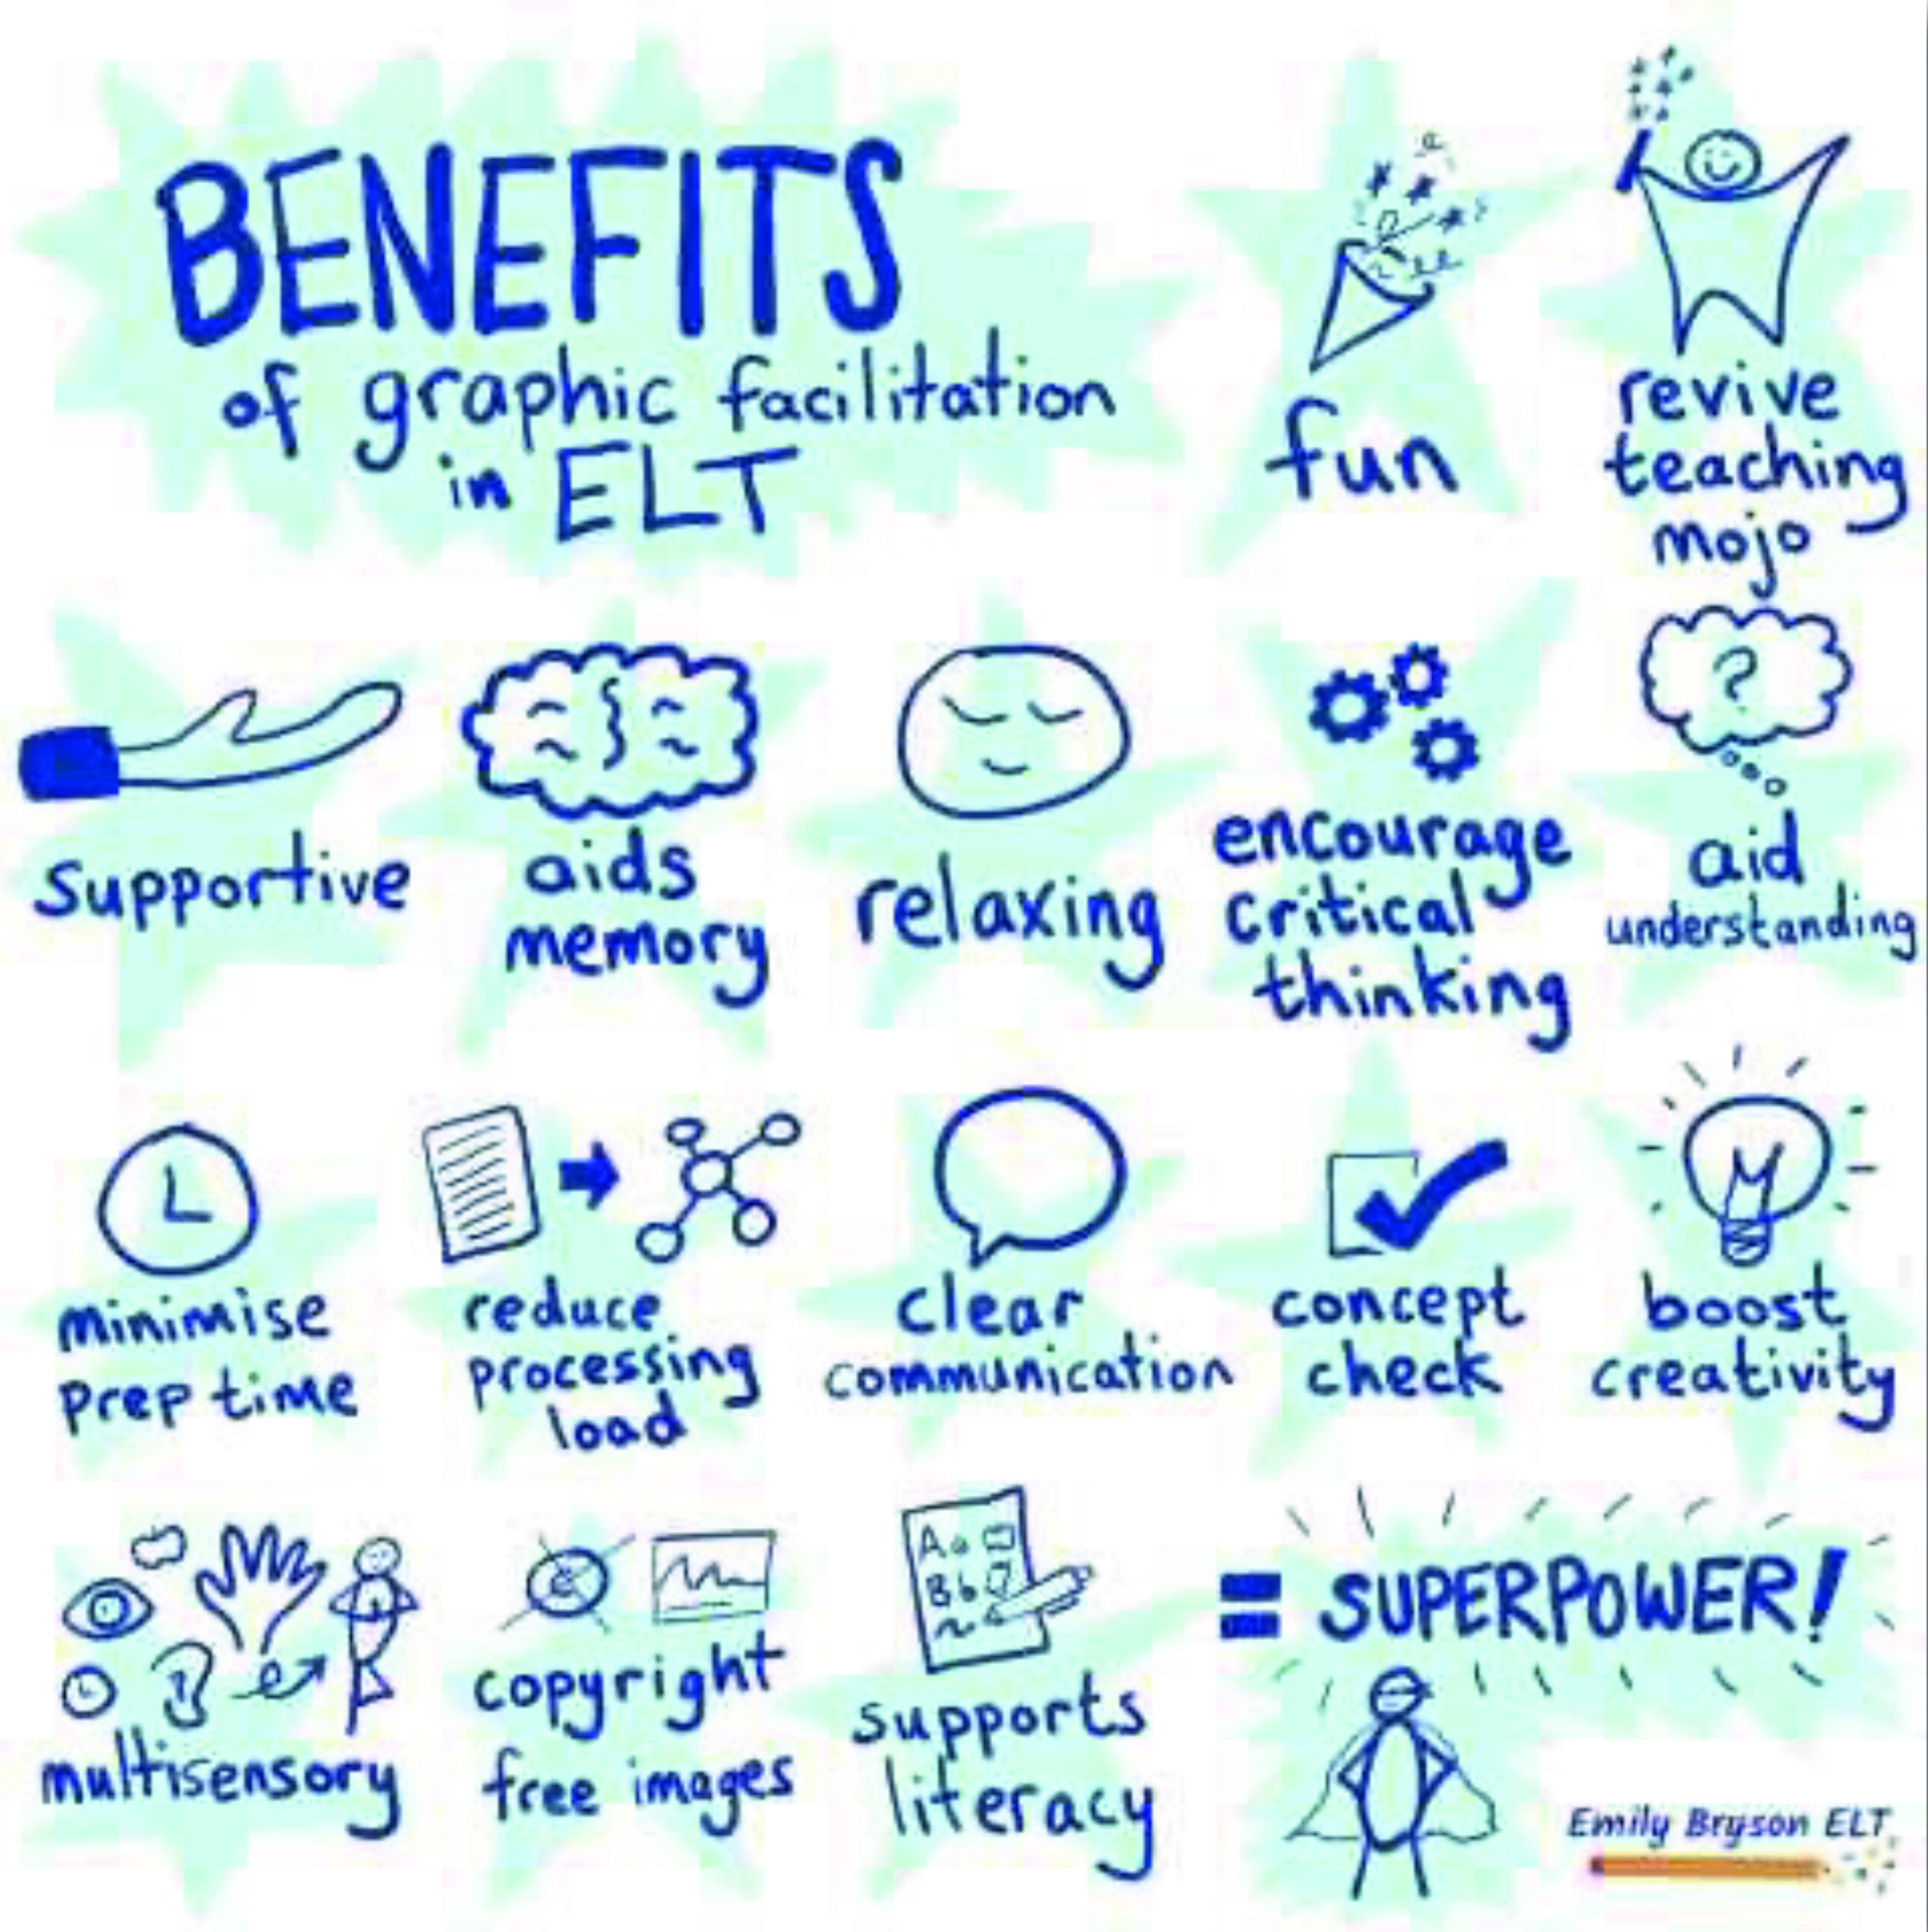
In the language classroom, drawing and creating simple visuals to support language learning and enhance clarity and comprehension is known as ‘graphic facilitation’. An extremely powerful tool for learners of all ages, and especially those at very low levels, these visuals can support cognitive processes in a number of ways: they provide a record of new language and they can aid retrieval of new vocabulary. In fact, Wammes, Meade and Fernandez (2016) found that people are more likely to remember if they doodle, and the relaxing and engaging nature of drawing can create a calm, low-pressure environment for learning. A visual can also be used to simplify complex terminology which learners may not yet be able to convey in words. Also, it’s a tool through which they can become more familiar with English’s notoriously opaque spelling system.
Graphic facilitation for pronunciation?
Alongside these benefits, the use of visuals can be helpful when teaching pronunciation. Simple shapes, lines and familiar icons can all be used to capture the articulation of sounds, highlight specific phonological features of English and support the perception and production of key sounds for increased intelligibility. Providing a drawing or image can also be useful when introducing students to new vocabulary. Instead of beginning by reading the word and interpreting its letters, a step which will have many students instinctively reaching for the sound-spelling rules of their mother tongue, we can begin by focusing on the image, the meaning it conveys and the sounds used to refer to it in speech.
The next paragraphs will outline some of the ways teachers of English can use visuals during pronunciation instruction to support their students’ comprehension and uptake of key features.
How do you feel about pronunciation?
Every learner (and teacher) comes to class with their own preconceived ideas, past experiences and mindset about pronunciation. Some may be positive and confident; others may have developed barriers to learning (or teaching). Visual tools can be a useful way to explore these challenges and perceptions.
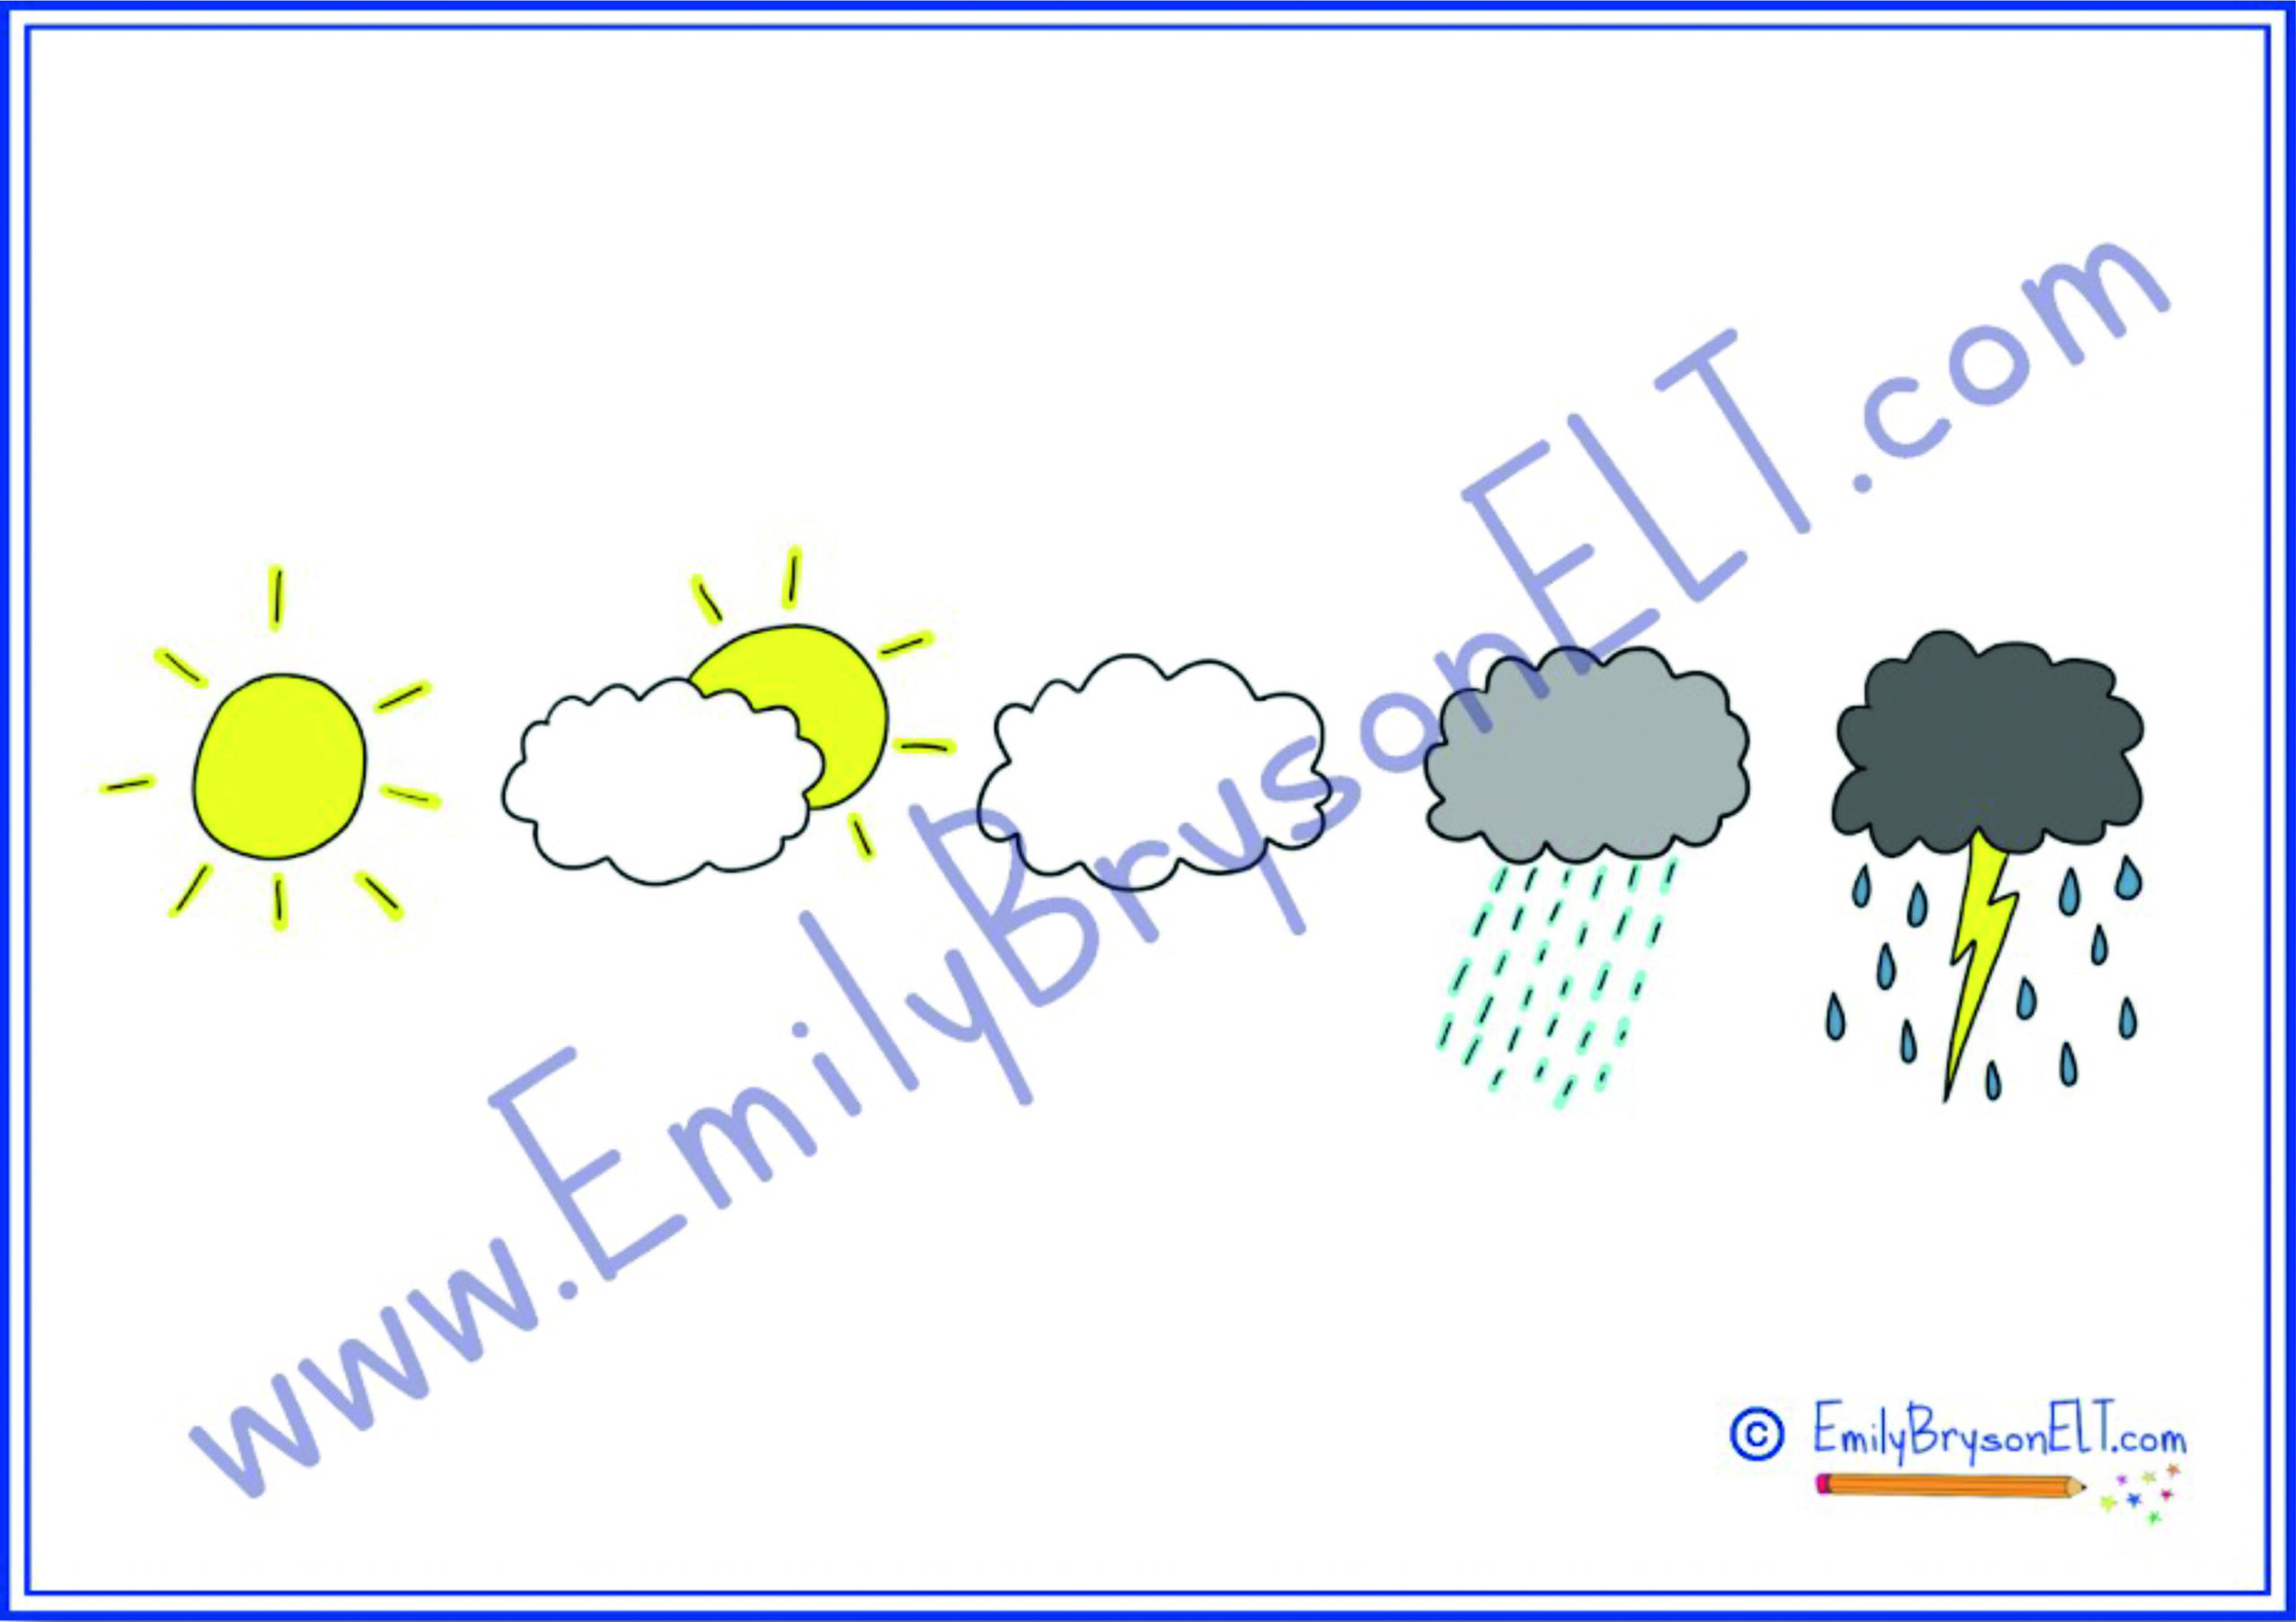
For example, using the metaphor of weather can be a fun way to discuss how learners feel towards various aspects of their language learning, or even their emotional wellbeing on that day. Visual storytelling techniques which use metaphors such as this can add an element of joy to what could otherwise be quite a serious topic. In short, they can soften the emotions behind the emotion!
To do this, display weather icons on the board, flipchart or virtual whiteboard. You can do this using emojis, images, drawing your own or by downloading Emily’s pre-drawn templates from her website (Figure 2). Five icons should be enough: a storm cloud with lightning and heavy rain; a rain cloud; a white fluffy cloud; a cloud with sun peeking out; and a bright sun. Then have students select one of the icons to represent how they feel about their pronunciation and discuss it with their peers. You could do this as a generalisation of their pronunciation as a whole, focus on specific features (e.g. stress, certain sounds) or cover other aspects of their language learning.
Using visuals to highlight intonation and stress
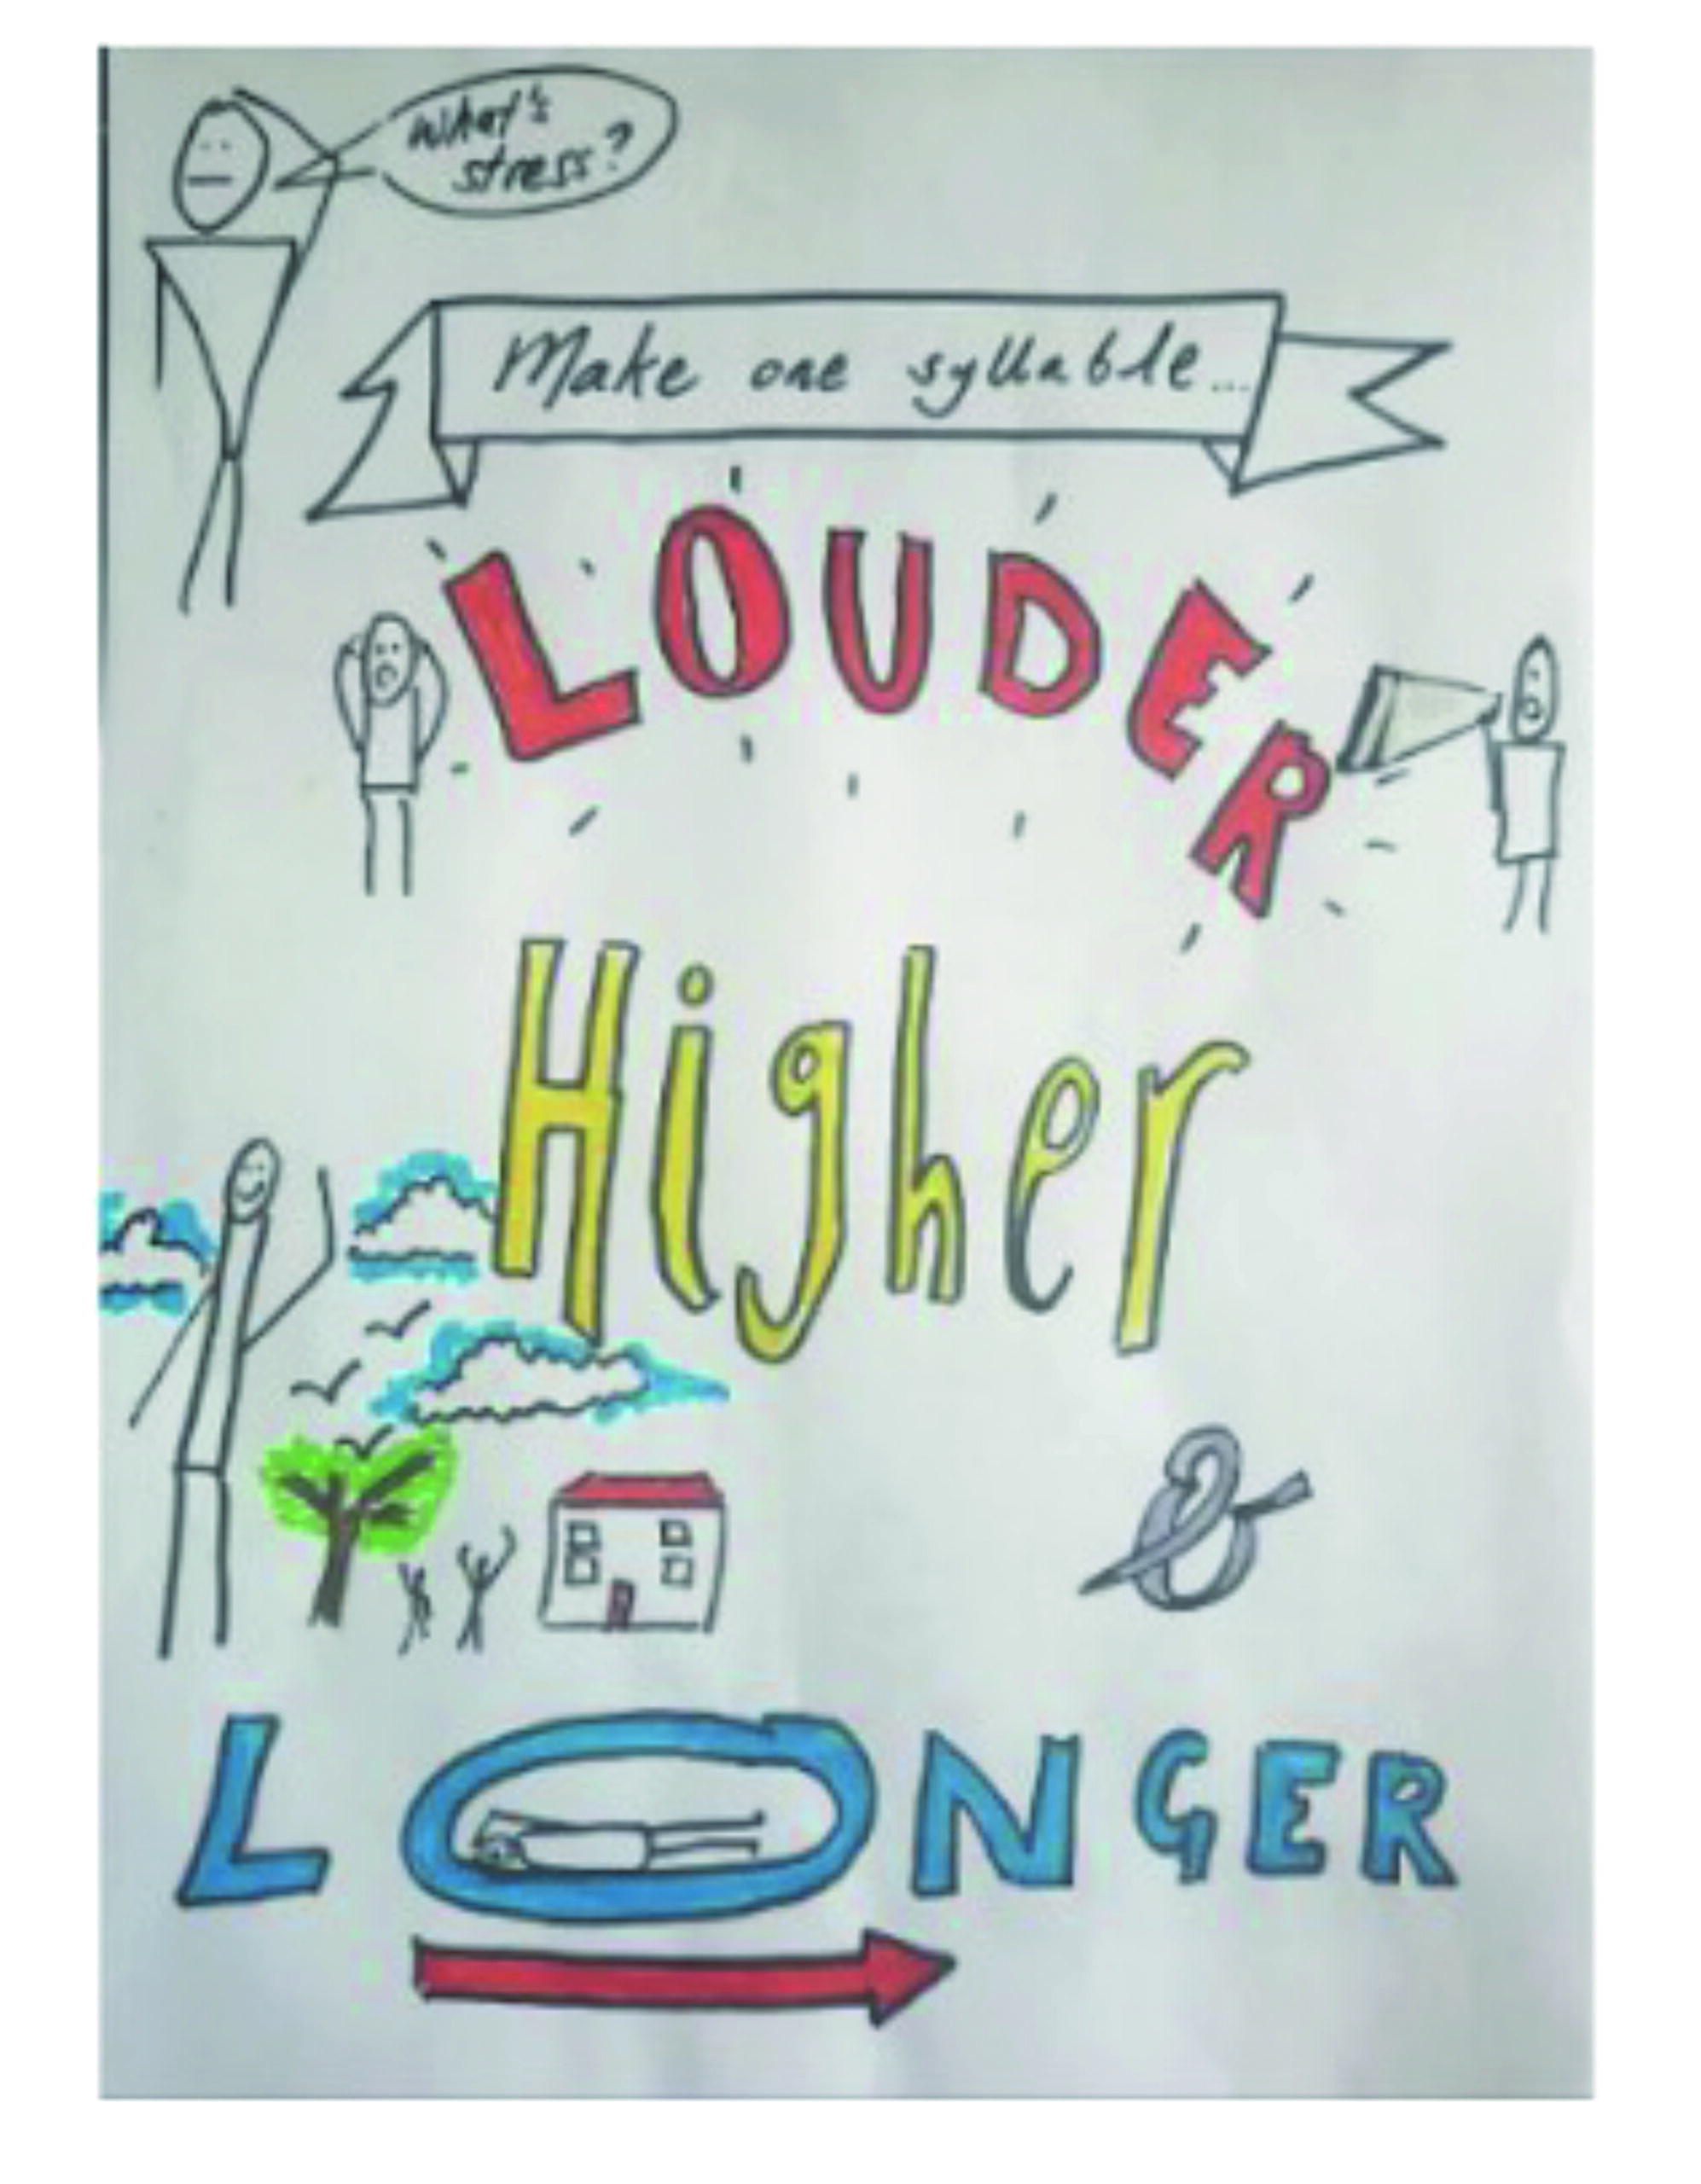
A fundamental feature of English that our learners must adjust to is its use of changing stress and intonation. At the sentence level, important information, usually conveyed through content words (nouns, adjectives, verbs and adverbs), is made more prominent. To do this at the word level, three things happen to the stressed syllable: we make it louder by increasing its volume, higher by changing the pitch of our voice and longer by increasing the duration of its vowel.
While L1, bilingual and highly proficient speakers of English are already sensitive to stress, this is not the case for many of our learners. For those who come from languages where stress is not used in the same way or is not as important for communication – think of the more syllable-timed languages of Japanese or Spanish and tonal languages such as Mandarin – perceiving stress can be challenging. In the classroom, this lack of sensitivity to stress is often called ‘stress deafness’ – when students struggle to perceive much (if any) difference between a stressed and unstressed syllable.
While in the classroom some learners might be able to cope with verbal instruction and feedback on stress and begin applying it immediately, others, in particular lower-level learners, may struggle. This is where visual thinking can be used effectively. To reduce the cognitive load, simplify the concept and skip wordy explanations, we can instead use simple images (Figure 3) to visualise the three steps: louder (volume), higher (pitch) and longer (vowel duration), pinpointing to learners what they should be listening for and using in their own speech in turn.
Word stress
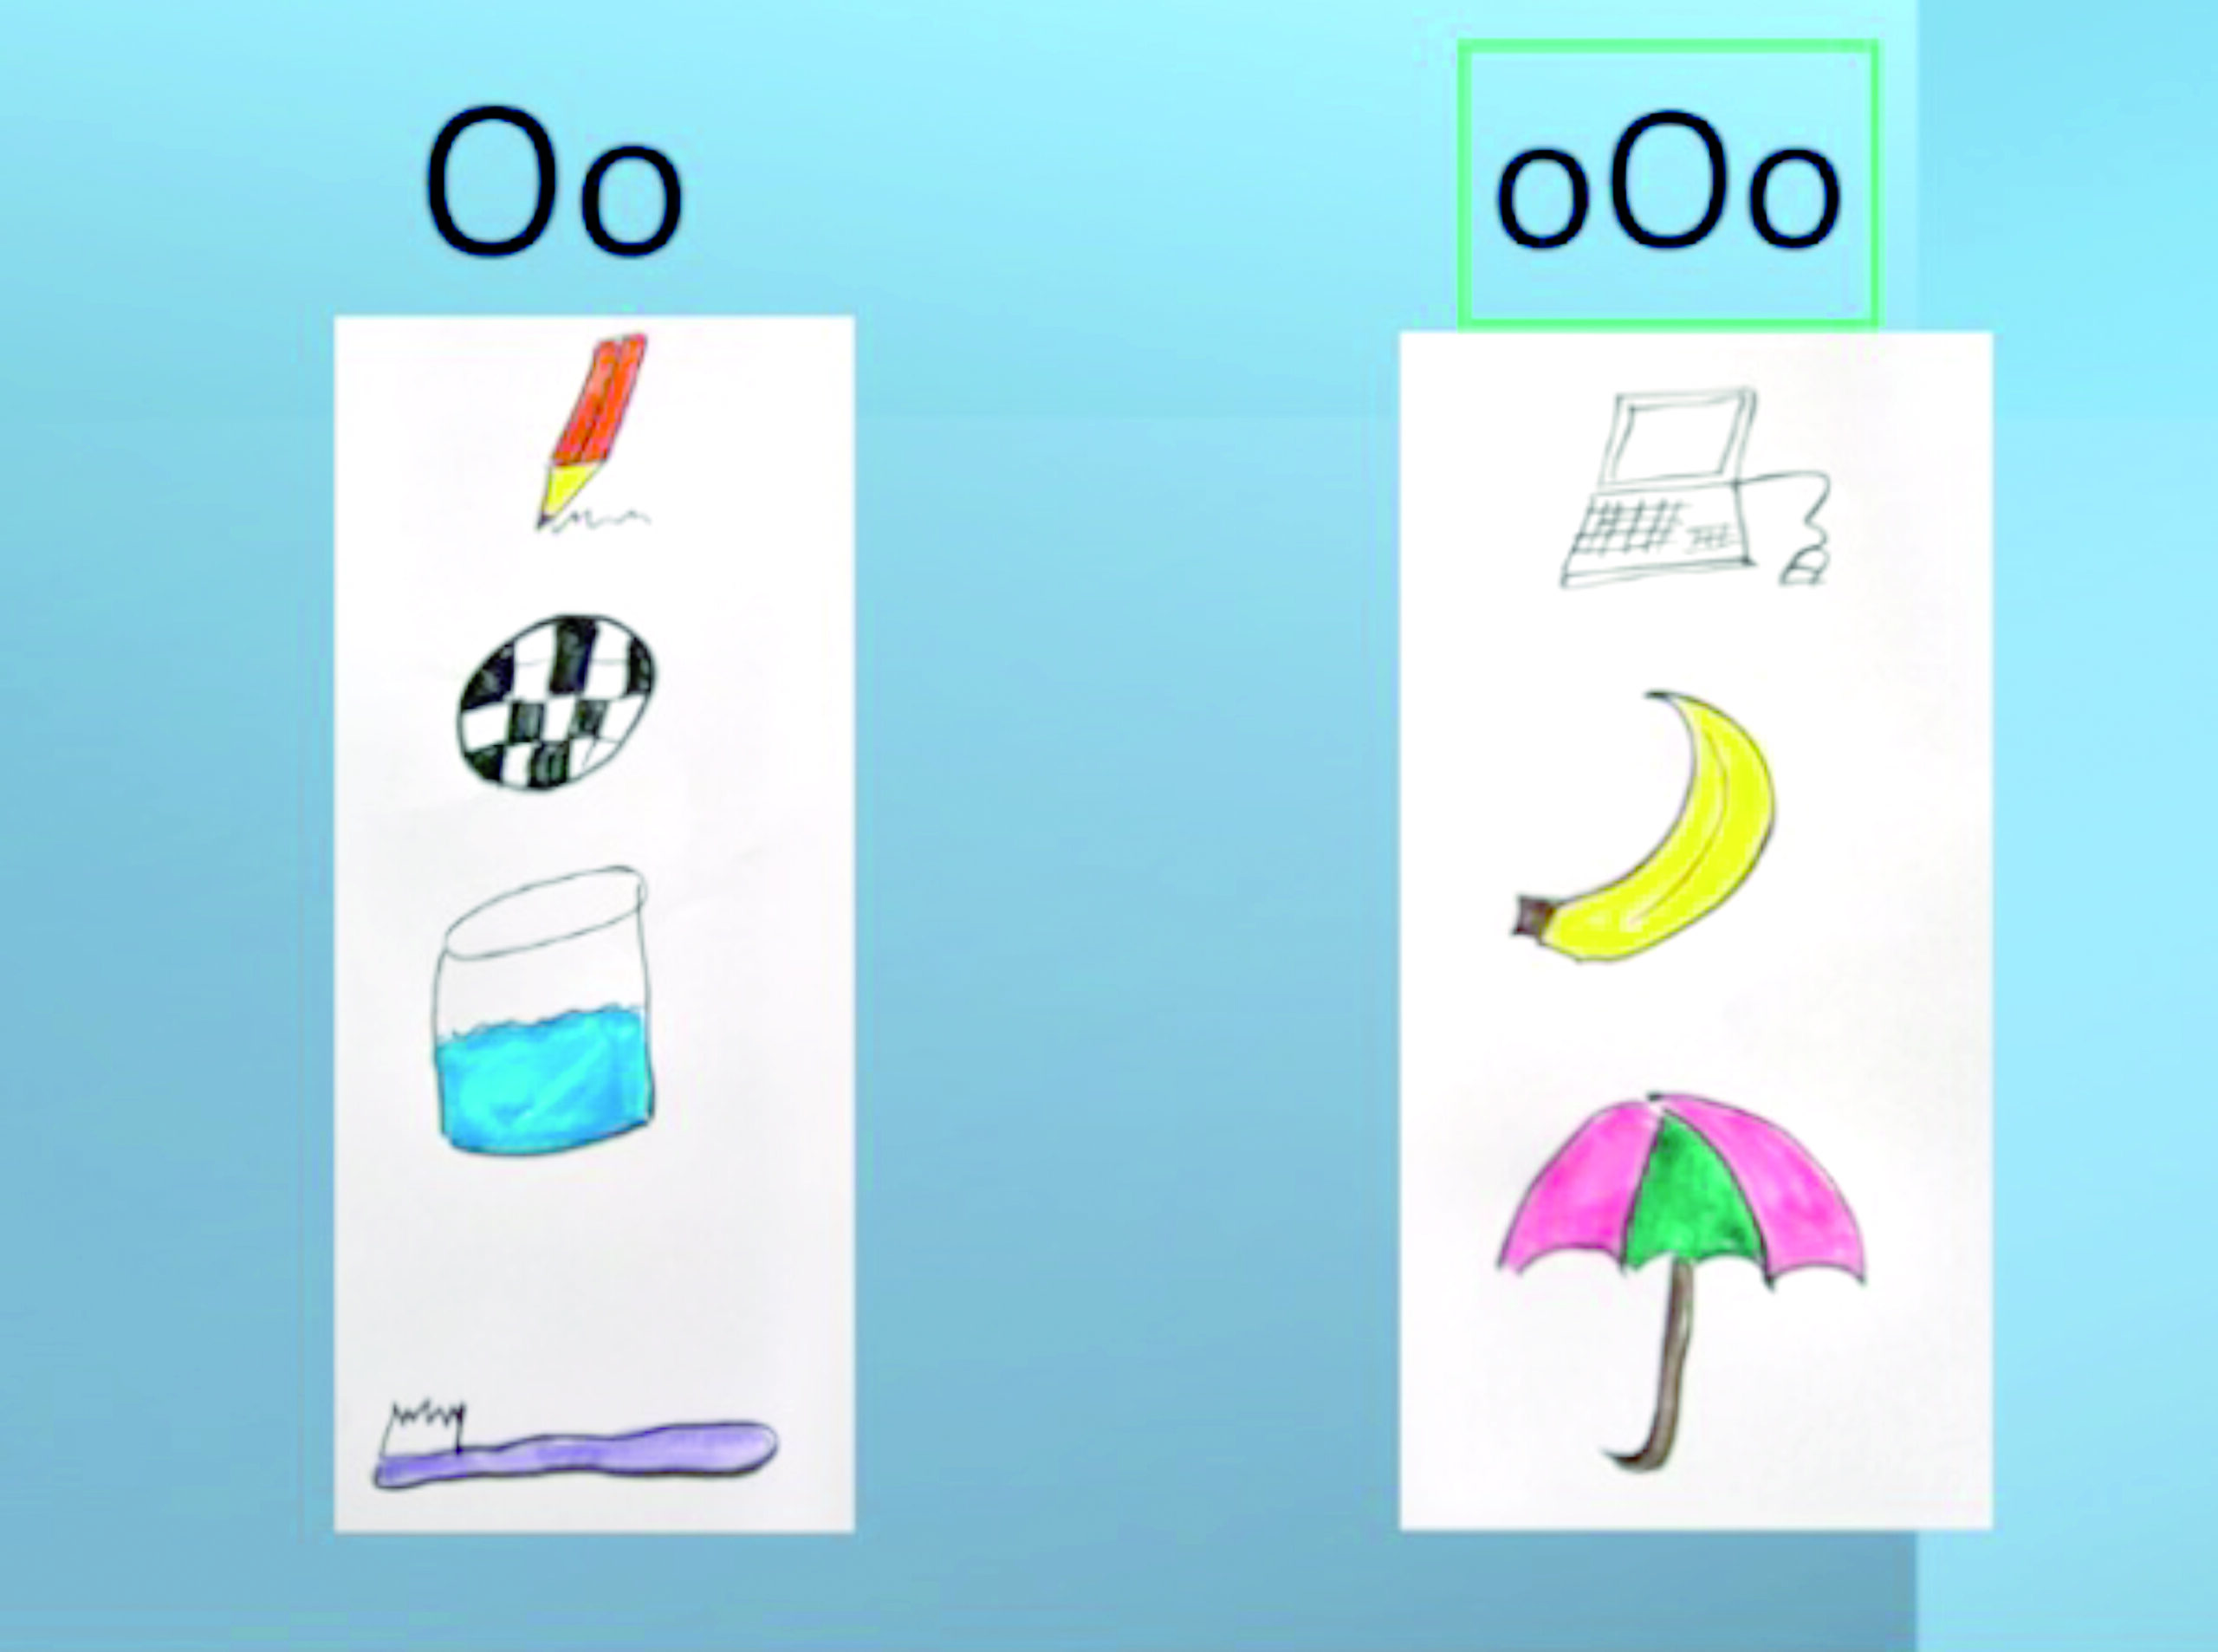
Word stress can be represented visually in other ways, too. Most teachers will be familiar with the use of circles to show stressed syllables within a word, their size changing to represent a stressed or unstressed syllable. For instance,
O = pen
Oo = pencil
oOo =computer
As can be seen in Figure 4, beyond asking students to write their own circles to capture the word stress they hear, we can also assign a stress pattern and ask them to draw examples of more objects that share this pattern. These drawings can be stuck to the board or wall from where they can be recycled in future lessons, turned into chants or made into story boards and songs.
Visualising sentence stress
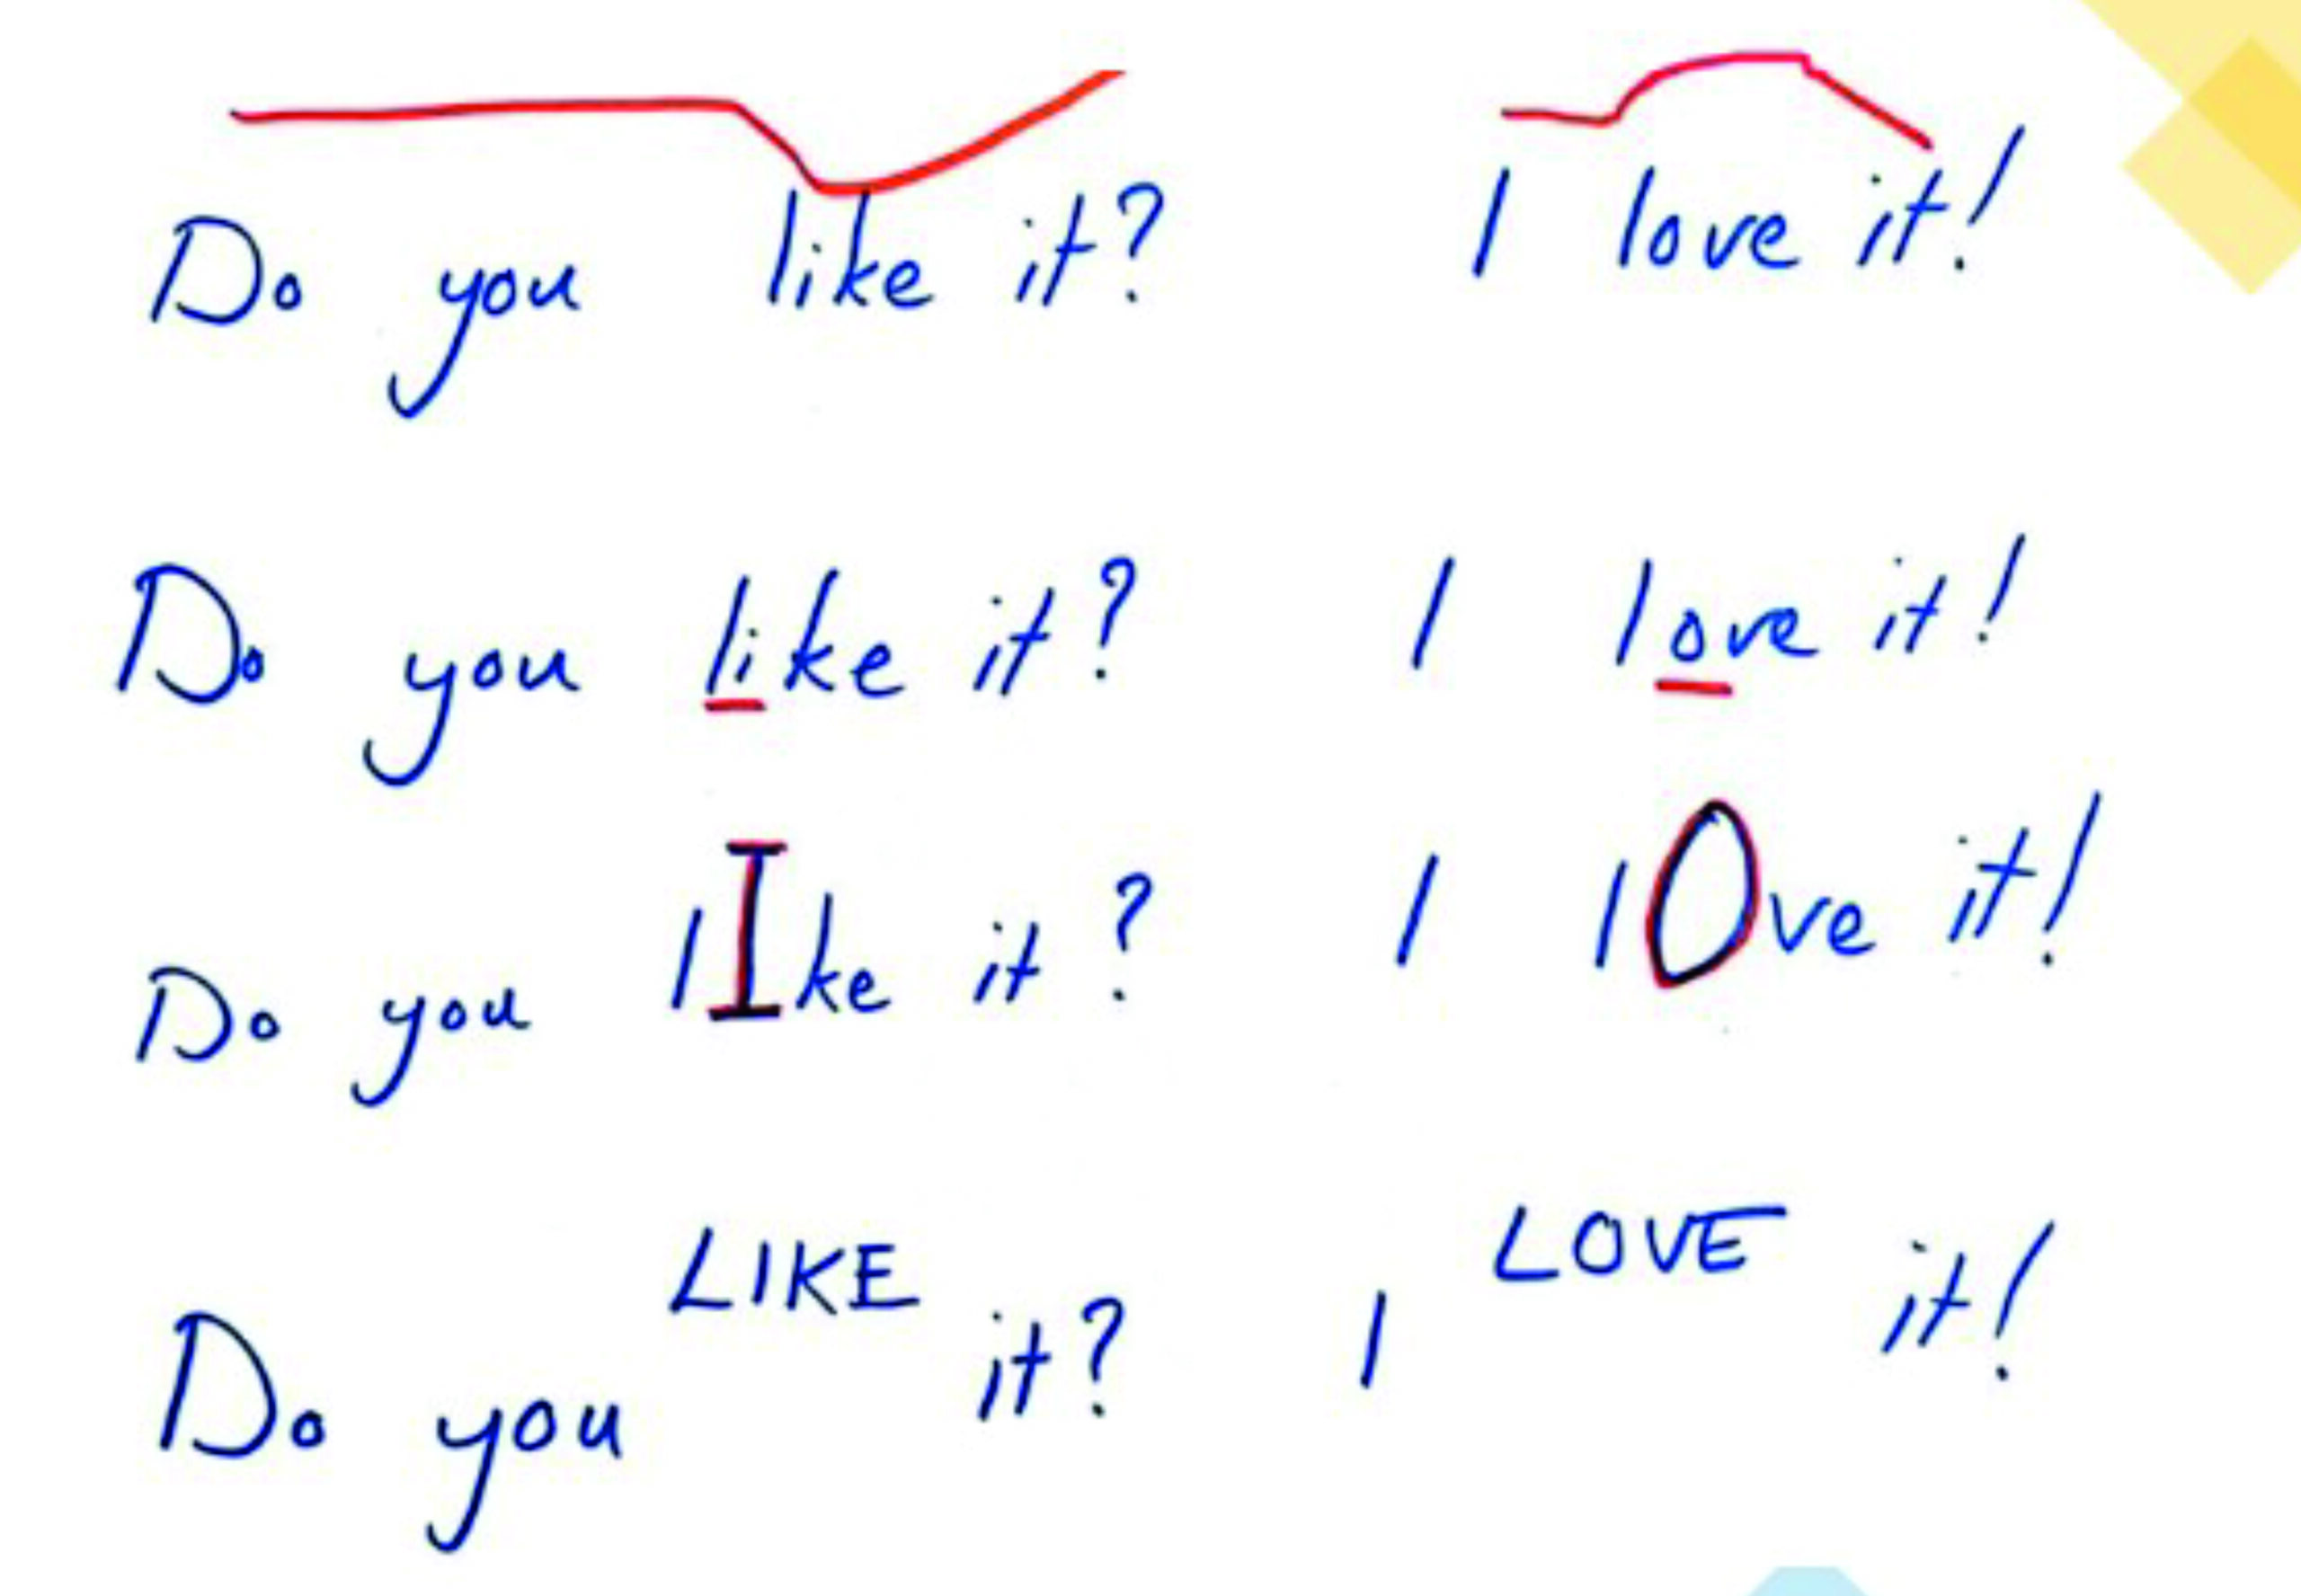
Once students have grasped the concept of stress at word level (what it is, how it sounds and how to produce it), we can use visuals to demonstrate stress across phrases too, known by several different names: sentence stress; tonic stress: and nuclear stress. This requires making one word in a phrase or utterance more stressed (or prominent) than all the others and is a crucial factor for international intelligibility (Jenkins, 2000).
Figure 5 demonstrates various ways in which sentence stress can be represented visually. These include the use of contour lines which demonstrate how intonation changes over the course of an utterance, underlining the peak vowel within the stressed syllable, capitalising the peak vowel in the stressed syllable, and placing the stressed word higher than other words in the phrase to convey its pitch movement.
While the first two of these methods can be easily applied in almost any context, the latter two could be challenging for low-literacy learners who are not yet completely accustomed to rules regarding when to use capital letters and who are not yet able to consistently write on the line. However, some musically minded students might appreciate this fourth method due to its resemblance to musical notes on a page of sheet music which rise and fall like our intonation.
Using visuals to highlight sound-spelling correspondence
Phonics, spelling and pronunciation are inextricably connected. When teaching emergent readers, it is essential to combine these features. Using simple visuals and graphic tools can help learners to notice similarities in spelling patterns. For example, they could create mind maps of words using the ‘ch’ sound or draw their own mnemonics to help them remember difficult spellings.
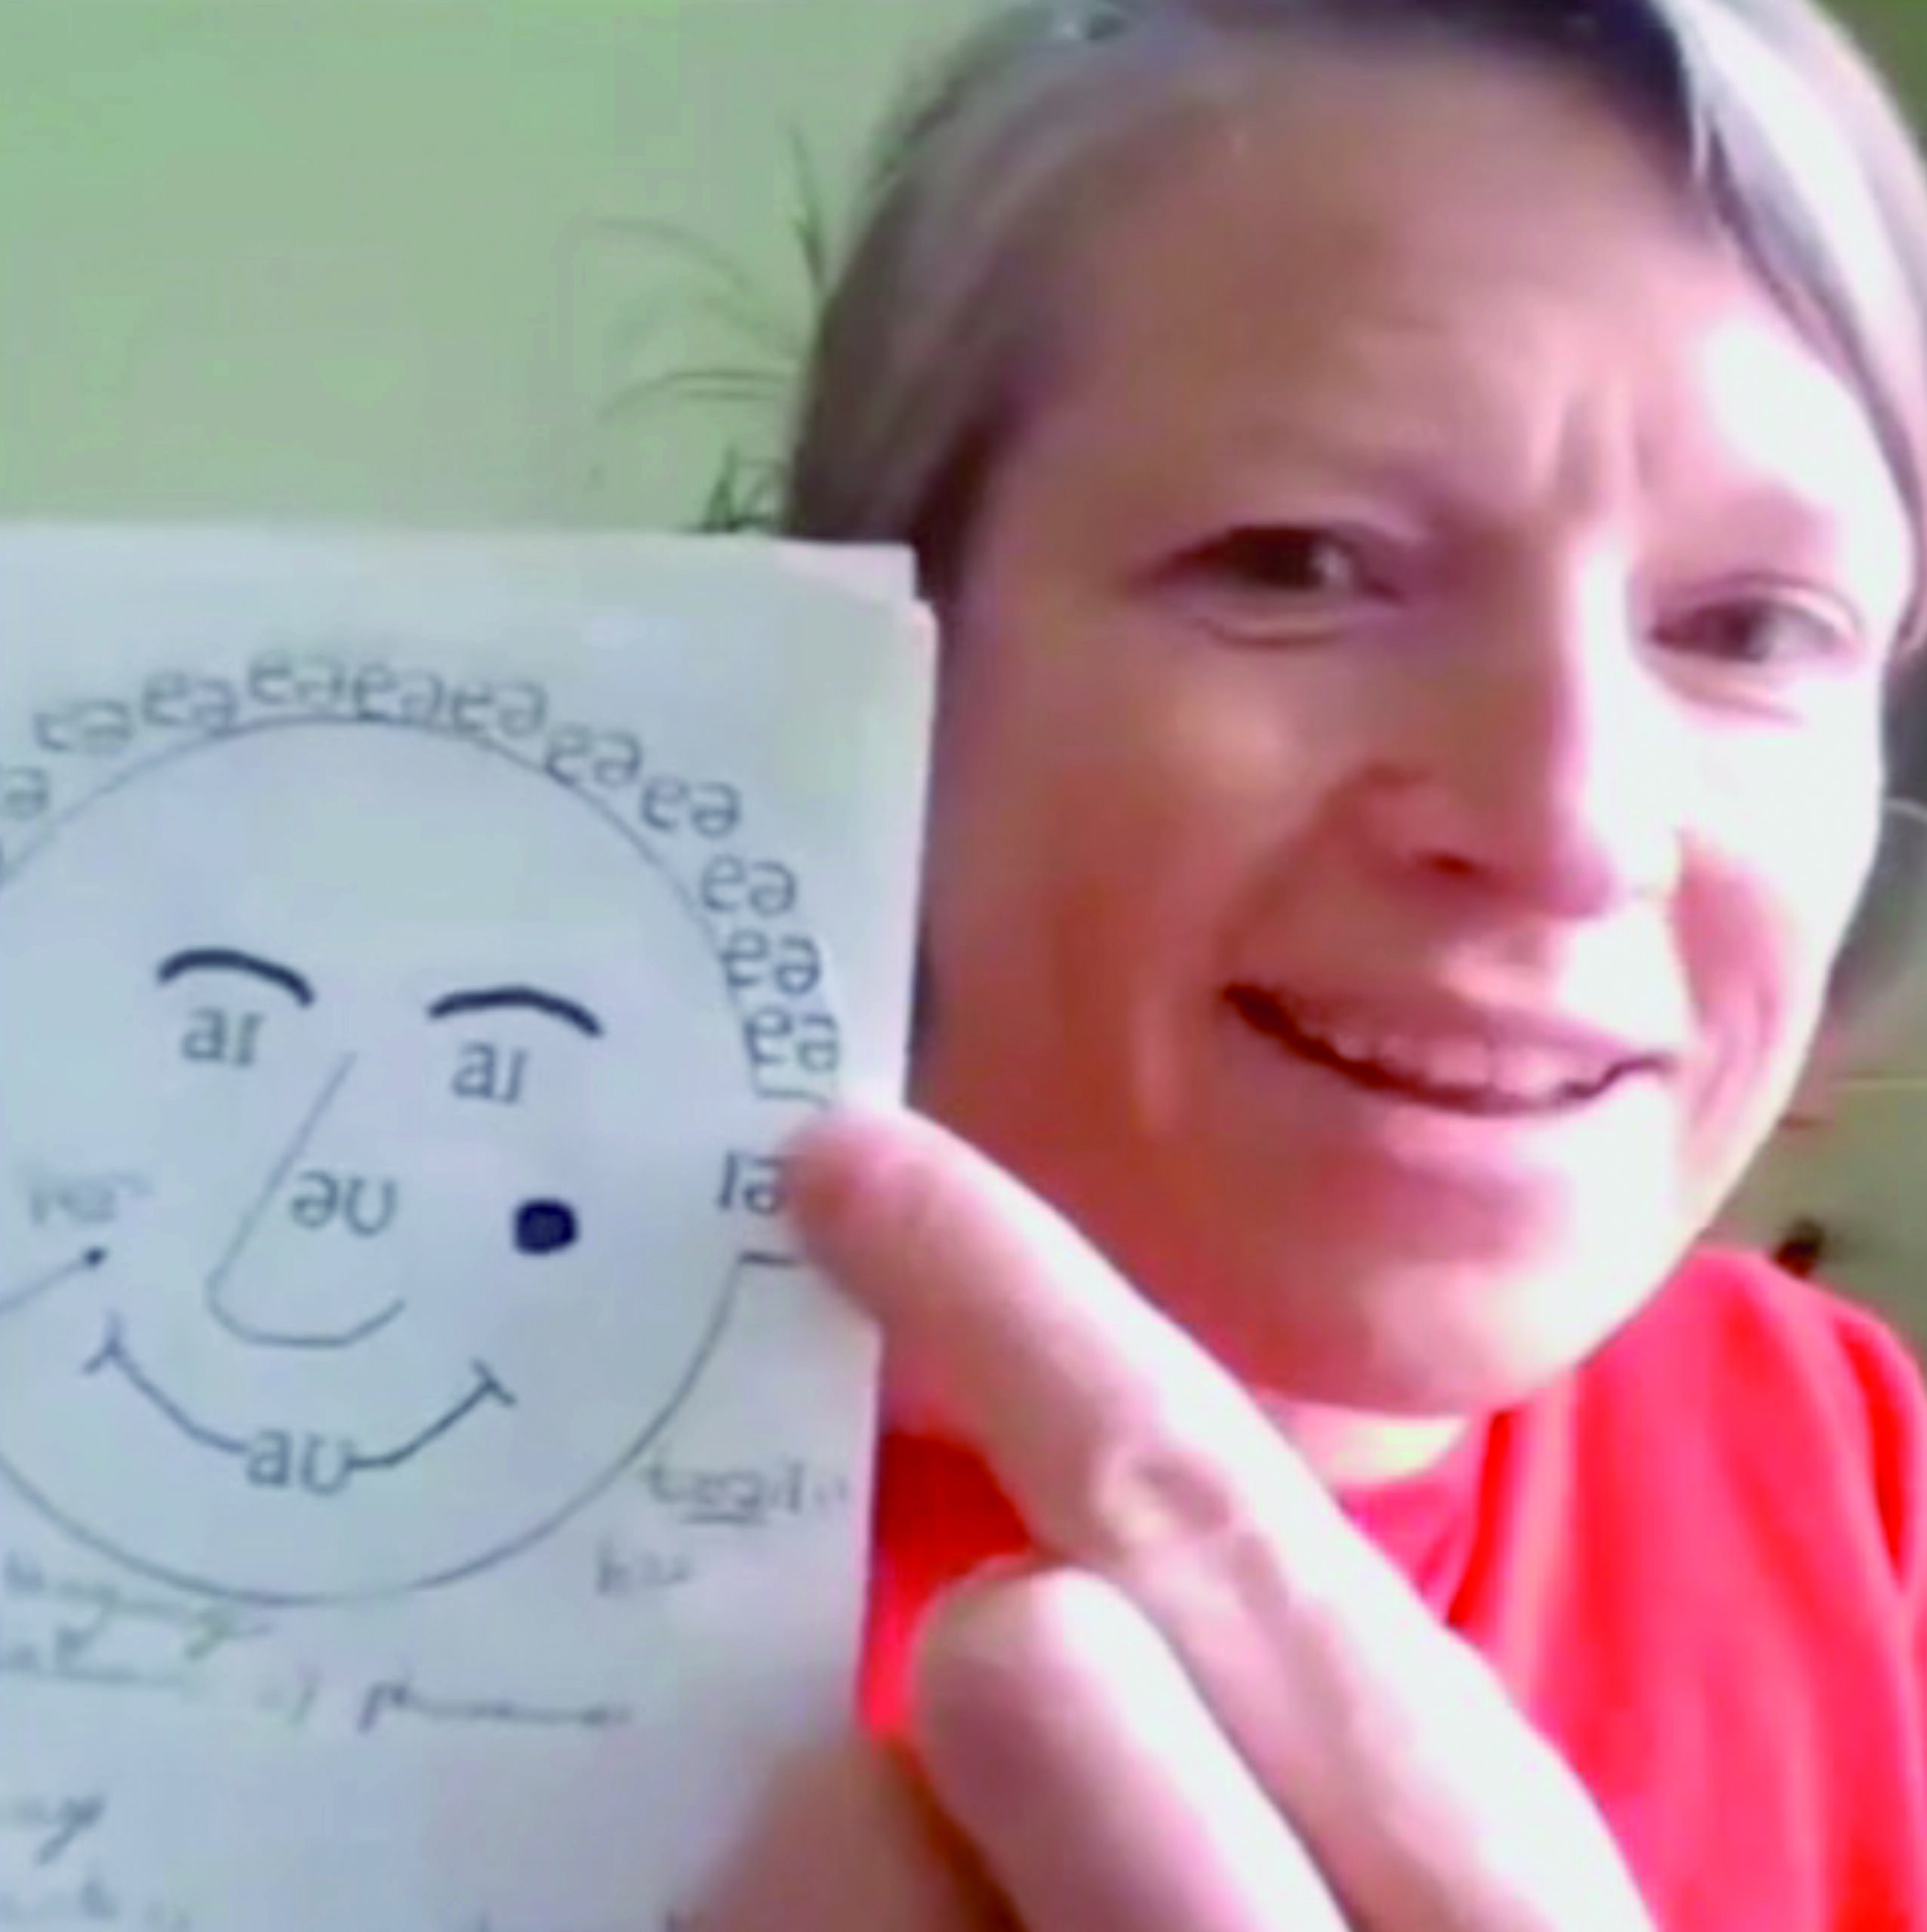
One cool visual tool whose origin remains a mystery is Roy the boy (aka /r ɔɪ/ the /b ɔɪ/) (Figure 6). We both heard about this when we did our diploma at TESOL Training Scotland many moons ago and we’ve been searching for the creator ever since! Roy uses a simple face to teach the following diphthongs:
/e ə/ = hair
/a ɪ/ = eye
/ əʊ/ = nose
/a ʊ/ = mouth
/e ɪ/ = face
/ ɪə/ = ear
Teachers may introduce Roy, then discuss different ways that each diphthong may be spelt, or words with similar spellings. They could also use the opportunity to discuss the similarities and differences between the pronunciation of each sound in the image and their pronunciation in local (or other) varieties of English. They could even create their own sound-themed images.
Using graphic facilitation to support articulation
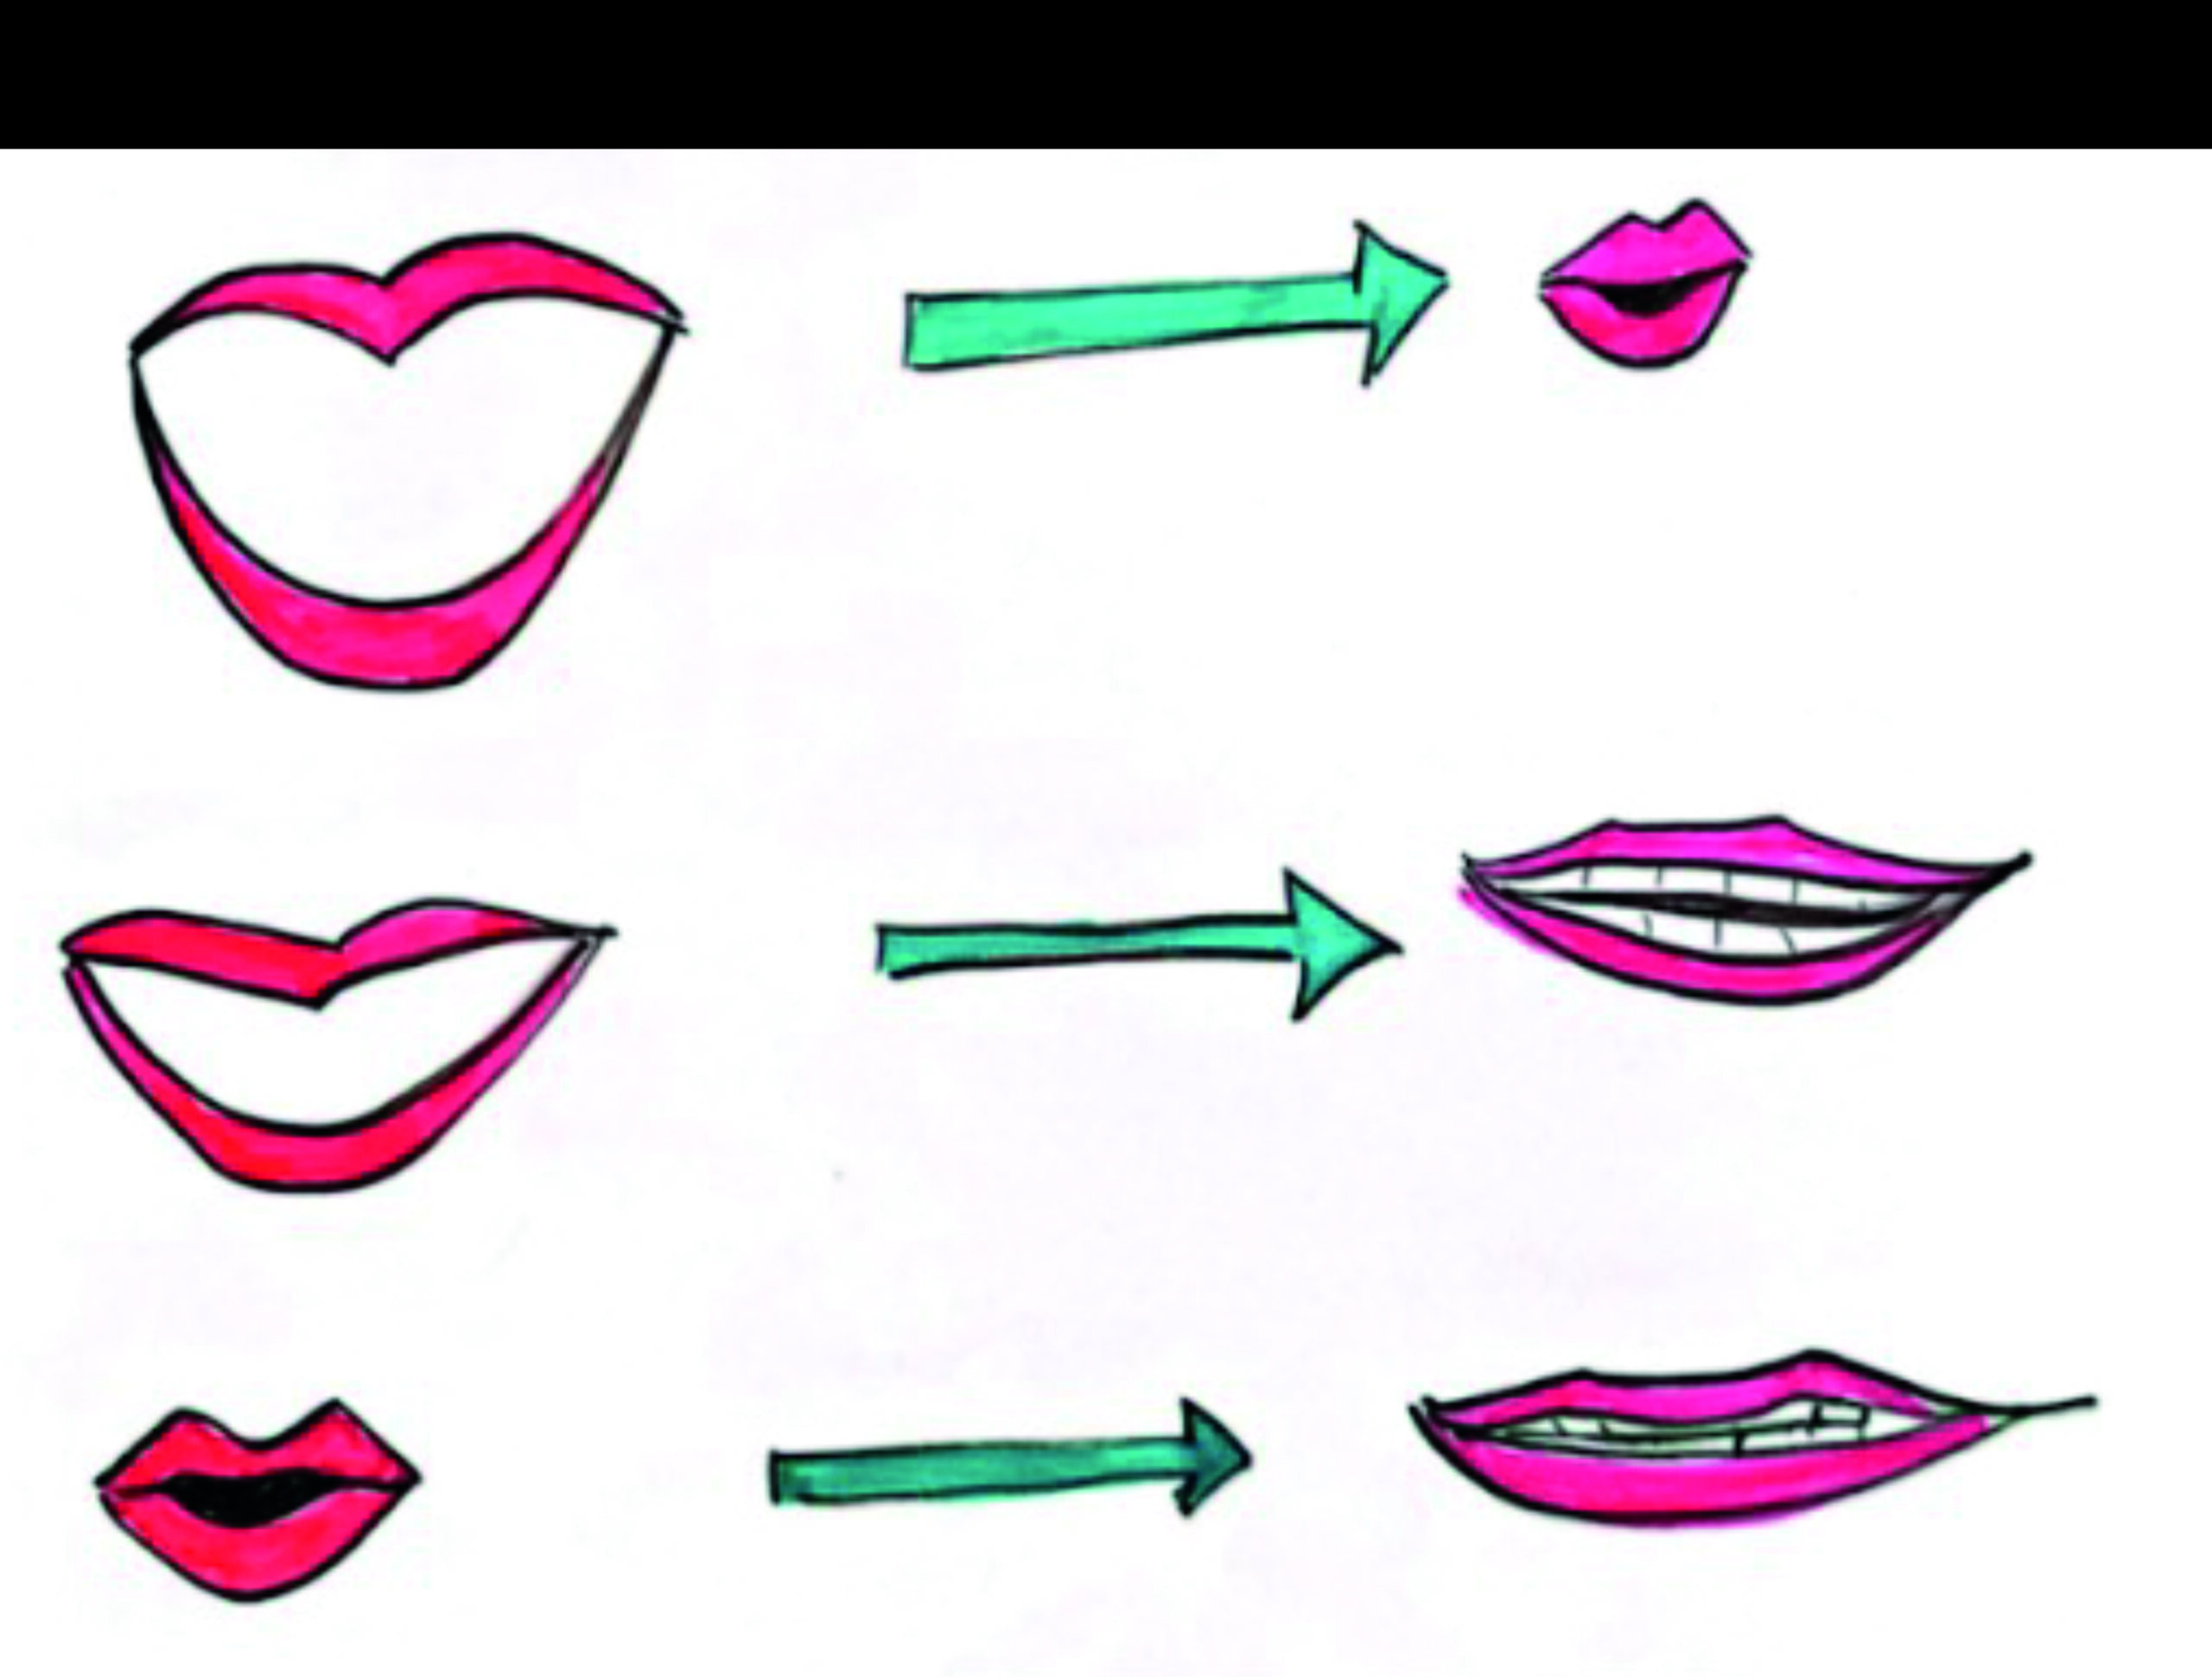
Learners struggling to overcome difficulties pronouncing individual sounds may be unaware of the subtle differences in their articulation. This is especially true of those which are absent from learners’ mother tongue sound inventories. By spending time examining, comparing and then making a simple drawing of their articulation, we can help students remember what they need to do in order to produce challenging sounds more clearly. These pictures could include the shape of the lips, openness of the mouth and/or position of the tongue.
In Figure 7, we can see that just by using simple lines, a basic visual representation of how the three diphthongs found in house, face and boy can be produced. On the left we have the mouth’s starting position and on the right its final position. Students could observe you or another speaker producing these sounds and make their own quick sketch to document the movement. Or, we could present the drawings or draw them live and elicit the target sound.
Tools for visual thinking
There are many ways to use visual strategies in the English language classroom, both face to face and online. In class, whiteboards, flipcharts and paper are invaluable. Online, virtual whiteboards such as Canva, Miro, Mural or Zoom are great ways to display visuals, add digital icons or draw using touch screen technology. Teachers can also hand draw visuals before class and scan them using an app such as Camscanner. They can then display them using software such as PowerPoint. Finally, document cameras (also known as visualisers) are a great way to project desktop doodles and notes to computer screens and virtual whiteboards.
Conclusion
Though the examples in this article are by no means exclusive, we hope that those we have shared demonstrate that visual strategies can be an effective tool to enhance learners’ language perception, production and retention of key pronunciation features necessary for intelligibility. Given their simplicity and flexibility, these strategies can be incorporated into any classroom with all types of students. They are also particularly effective for those for whom more traditional methods, such as use of the International Phonetic Alphabet, may not be suitable, for instance, Young Learners or low-literacy adult learners. As such, their inclusion in pronunciation training not only helps create an engaging and interactive learning environment, but also encourages an inclusive one.
For more strategies and information on teaching pronunciation using visual thinking techniques, check out Emily and Gemma’s course ‘Sketching Sounds: graphic approaches to teaching pronunciation’ at www.EmilyBrysonELT.com
References
Jenkins, J. (2000). The Phonology of English as an International Language. Oxford University Press.
Wammes, J.D., Meade, M.E., & Fernandes, M.A. (2016). ‘The drawing effect: evidence for reliable and robust memory benefits in free recall’. Quarterly Journal of Experimental Psychology 69 9:1752–1776. Available from https://doi.org/10.1080/17470218.2015.1094494 (Last accessed 17 March 2025).
